

In my previous articles of Spring Boot, I have covered the introduction of Spring Boot , Its advantages, limitations, goals, features etc and the Key Components of the Spring Boot.
If you have not read my introduction article of Spring Boot, I would request you to take a look – Spring Boot Tutorial.
There exists following ways to create Spring Boot project. We can use any of below mentioned approach to create Spring Boot Application :
We are going to cover here How to develop “Spring Boot Application using Spring Boot CLI”.
Spring Boot Project using Spring Boot CLI
We are using Eclipse IDE for the below example. It is very popular IDE for java projects. You can download it from here.
Let’s get started :
Step 1 : Download / Install the Spring Boot CLI tool
Spring Boot CLI is a tool provided by The Spring team. This tool is used to run and test the Spring Boot application using command prompt.
Download the Spring Boot CLI tool from here.

Extract the Downloaded zip file in your System.

Step 2 : Configure the Spring Boot CLI tool
The downloaded folder will contain two files in bin folder -
- spring ( for Mac or Linux )
- spring.bat ( for Windows )
Open Command Prompt and run below command to set the Spring Boot CLI Environment Variables in Windows System :
set PATH=E:\spring-2.1.8.RELEASE\bin;%PATH%
In the above command, write the path where you have stored the downloaded file.
Or Set the path Manually by using below steps in Windows :

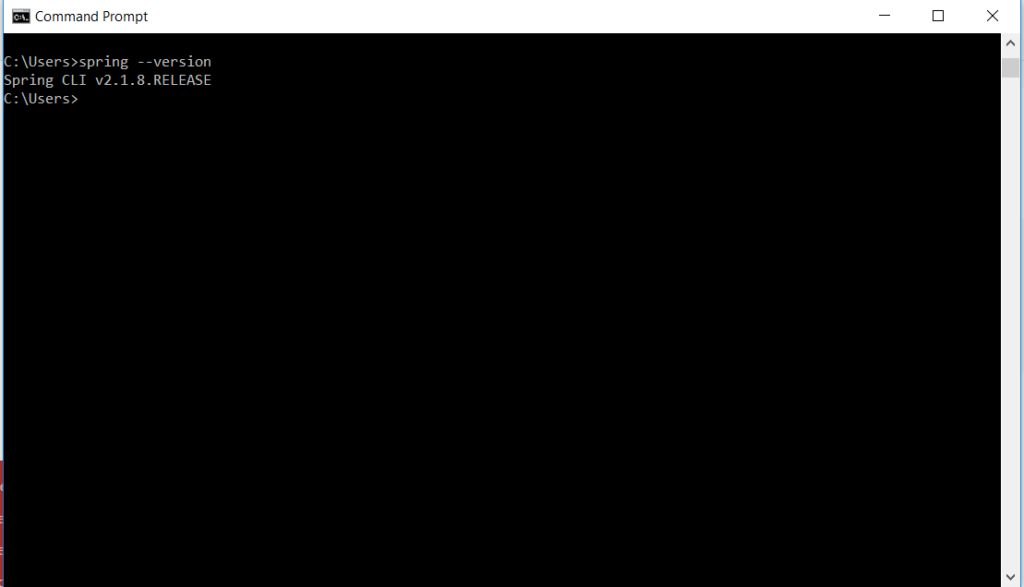
Verify the Installation process by running below command :
spring -version
or
spring -help
Step 3 : Develop the Application using Spring Boot CLI
CLI only executes the groovy files. So, let us create one groovy file for our Spring Boot application.
- Create a file “App.groovy” in your system.
- Place the below content in created file.
@Controller
class App {
  @RequestMapping("/")
  @ResponseBody
  String app() {
    "Hello World!!"
  }
}
- @Controller indicates that class is a Controller.
- @RequestMapping annotation maps HTTP requests to handler methods of controllers.
- @ResponseBody is annotation which binds the method return value to the web response body.
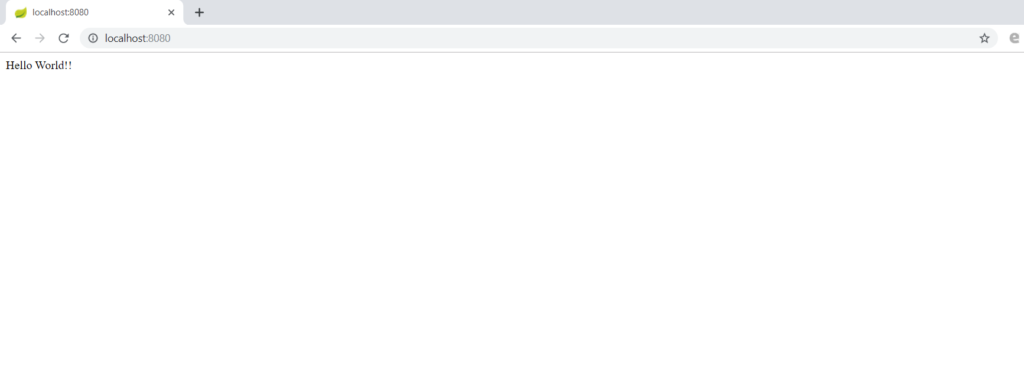
Step 4 : Running the Application
Execute the below command in CLI :
spring run App.groovy

Output :
Conclusion
That’s all folks! In this article, we have learnt How to develop the Spring Boot Application using ‘Spring Boot CLI’.