
In this article, We will learn to develop the REST API services with Spring Boot.
If you have not read my introduction article of Spring Boot, I would request you to take a look – Spring Boot Tutorial.
Building RESTful Web Services with Spring Boot is very easy as it provides good support for REST services. RESTful Web services are really popular these days for enterprise applications.
In this tutorial, we will learn how to create the RESTful Web services with Spring Boot.
Let’s get started :
Quick overview of RESTful Web Services
Web services are used as a medium in World Wide Web for communication between the client application and server application. It provides one platform for both the applications (client and server) so that multiple application can be built and communication can happen.
- REST expanded as REpresentational State Transfer.
- REST is basically used for developing Web services which are maintainable, lightweight and scalable.
- Restful Web Services uses client-server architecture which is stateless.
- Http GET and POST both methods can be used by the REST Client applications.
- REST Web services are lightweight as compared with the SOAP Web services. Additionally, REST APIs does not follow any standard.
- Any type of request and response data like XML, JSON or text etc are supported by the REST API.
Create the Spring Boot Project
We are using Eclipse IDE here for the tutorial.
There exists following ways to create Spring Boot project. We can use any of below mentioned approach to create Spring Boot Application :
Here we are explaining this tutorial by following “Spring Boot Project with Maven”. You can check and test any of the above mentioned way.
1) Create a new Maven Project
Click on File -> New -> Project :

Select option as Maven Project from the wizard and click on Next :
Select the option as below image and click on Next :
Provide Project details and the click on Finish :

Now our Project is created with the following pom.xml :

pom.xml :
<project xmlns="http://maven.apache.org/POM/4.0.0" xmlns:xsi="http://www.w3.org/2001/XMLSchema-instance" xsi:schemaLocation="http://maven.apache.org/POM/4.0.0 http://maven.apache.org/xsd/maven-4.0.0.xsd">
  <modelVersion>4.0.0</modelVersion>
  <groupId>springWithRestAPI</groupId>
  <artifactId>example</artifactId>
  <version>0.0.1-SNAPSHOT</version>
</project>
2) Configure Spring Boot in Eclipse / Add the dependencies for Spring Boot
Firstly add the spring-boot-starter-parent as parent of our Maven project as adding parent dependency helps in managing the version.
<parent>
	<groupId>org.springframework.boot</groupId>
	<artifactId>spring-boot-starter-parent</artifactId>
	<version>2.1.3.RELEASE</version>
</parent>
Now , add the spring-boot-starter-web dependency in pom.xml :
<dependencies>
	<dependency>
		<groupId>org.springframework.boot</groupId>
		<artifactId>spring-boot-starter-web</artifactId>
	</dependency>
</dependencies>
Now, Add the Java version of the Project in your pom.xml :
<properties>
    <java.version>1.8</java.version>
</properties>
Below is our updated pom.xml :
<project xmlns="http://maven.apache.org/POM/4.0.0"
xmlns:xsi="http://www.w3.org/2001/XMLSchema-instance"
xsi:schemaLocation="http://maven.apache.org/POM/4.0.0 http://maven.apache.org/xsd/maven-4.0.0.xsd">
<modelVersion>4.0.0</modelVersion>
<groupId>springWithRestAPI</groupId>
<artifactId>example</artifactId>
<version>0.0.1-SNAPSHOT</version>
<parent>
<groupId>org.springframework.boot</groupId>
<artifactId>spring-boot-starter-parent</artifactId>
<version>2.1.3.RELEASE</version>
</parent>
<dependencies>
<dependency>
<groupId>org.springframework.boot</groupId>
<artifactId>spring-boot-starter-web</artifactId>
</dependency>
</dependencies>
<properties>
<java.version>1.8</java.version>
</properties>
</project>
3) Create the Launch class for Spring Boot Application
Every Spring Boot Application needs one launch class. This class is annotated with the @SpringBootApplication.
let us create our launch class inside the src/main/java :

Now, Annotate this class with @SpringBootApplication and call the static method run of SpringApplication class with the class name as parameter :
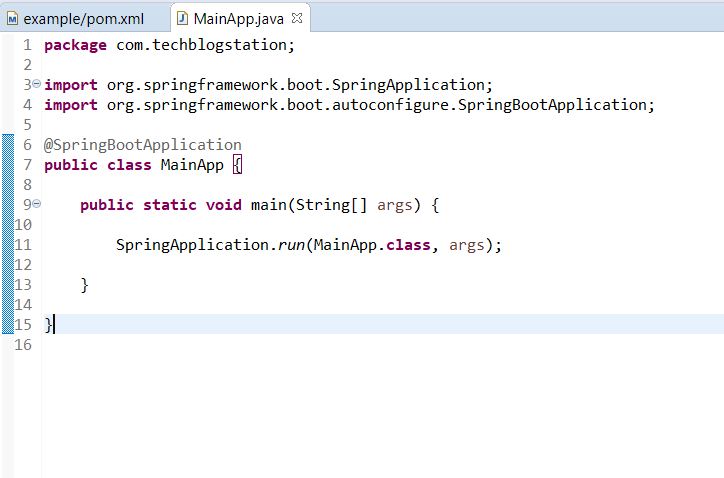
- @SpringBootApplication annotation makes this class a configuration class.
- SpringApplication is used here as it bootstraps and auto-configures our application and also it starts the embedded Tomcat server. As we have passed the class name in run method argument, It indicates that this is primary Spring Component for our Project.
Create the REST API Controller in Spring Boot
- Rest Controllers in Spring Boot are those controllers which are capable of serving the REST API request.
- These controllers are annotated with @RestController.
- @RequestMapping annotation is used to specify the resource uris. This annotation can be applied on class and method level.
- However, the Complete URI gets resolved after adding the class level path and method level path.
- produces and consumes attributes are used to define the meditype e.g JSON, TEXT etc.
Now let’s write one Rest controller class with one Http Get and one Http Post method :
package com.techblogstation.controllers;
import java.net.URI;
import org.springframework.beans.factory.annotation.Autowired;
import org.springframework.http.ResponseEntity;
import org.springframework.web.bind.annotation.GetMapping;
import org.springframework.web.bind.annotation.PostMapping;
import org.springframework.web.bind.annotation.RequestBody;
import org.springframework.web.bind.annotation.RequestMapping;
import org.springframework.web.bind.annotation.RestController;
import org.springframework.web.servlet.support.ServletUriComponentsBuilder;
import com.techblogstation.dao.StudentDAO;
import com.techblogstation.models.StudentPOJO;
@RestController
@RequestMapping(path = "/students")
public class StudentController
{
    @Autowired
    private StudentDAO studentDAO;
    //Http Get method to get the student list in JSON format
    @GetMapping(path="/", produces = "application/json")
    public StudentPOJO getStudentList()
    {
        return studentDAO.getAllStudents();
    }
    //Http Post method to add the student in the student list
    @PostMapping(path= "/", consumes = "application/json", produces = "application/json")
    public ResponseEntity<Object> addStudent(@RequestBody StudentPOJO student)
    {
        Integer id = studentDAO.getAllStudents().getStudentList().size() + 1;
        student.setId(id);
        studentDAO.addStudent(student);
        URI location = ServletUriComponentsBuilder.fromCurrentRequest()
                                    .path("/{id}")
                                    .buildAndExpand(student.getId())
                                    .toUri();
        return ResponseEntity.created(location).build();
    }
}
In the above example :
- We have defined the class as a Rest controller using the @RestController annotation.
- @RequestMapping(path = “/students”) specifies that this rest controller will be used for the requests with path /students.
- @GetMapping(path=”/”, produces = “application/json”) defines that the annotated method will get called with Http Get method and url as /students/ and it will return the response in JSON format.
- @PostMapping(path= “/”, consumes = “application/json”, produces = “application/json”) defines that the annotated method will get called with Http Post method and url as /students/ and it will return the response in JSON format and it will receive the request in JSON format.
This is the basic example to understand the REST API with Spring Boot using Http Get and Post method.
In the above example : I am using DAO and Model classes to add the student and retrieve the students through web services. So let’s take a look at these classes as well :
Create the DAO class to create dummy data
package com.techblogstation.dao;
import org.springframework.stereotype.Repository;
import com.techblogstation.models.StudentPOJO;
@Repository
public class StudentDAO
{
private static StudentPOJO list = new StudentPOJO();
//In below static block, we are adding three students
static
{
list.getStudentList().add(new StudentPOJO(1, "Tech", "Blog"));
list.getStudentList().add(new StudentPOJO(2, "Rachel", "Green"));
list.getStudentList().add(new StudentPOJO(3, "Chandler", "Bing"));
}
//method to return the student list
public StudentPOJO getAllStudents()
{
return list;
}
//method to add the student in the list
public void addStudent(StudentPOJO student) {
list.getStudentList().add(student);
}
}
In above class, we are creating some dummy data for retrieval through the REST APIs.
Create the Model class to hold the dummy data
package com.techblogstation.models;
import java.util.ArrayList;
import java.util.List;
public class StudentPOJO {
private List<StudentPOJO> studentList;
public StudentPOJO() {}
//Constructor to store data in the instance variables
public StudentPOJO(Integer id, String firstName, String lastName) {
super();
this.id = id;
this.firstName = firstName;
this.lastName = lastName;
}
//Method to retrieve the students
public List<StudentPOJO> getStudentList() {
if (studentList == null) {
studentList = new ArrayList<StudentPOJO>();
}
return studentList;
}
//Method for Addition of student
public void setEmployeeList(List<StudentPOJO> studentList) {
this.studentList = studentList;
}
//Variables
private Integer id;
private String firstName;
private String lastName;
@Override
public String toString() {
return "Student [id=" + id + ", firstName=" + firstName + ",lastName=" + lastName + "]";
}
//Setters and Getters
public Integer getId() {
return id;
}
public void setId(Integer id) {
this.id = id;
}
public String getFirstName() {
return firstName;
}
public void setFirstName(String firstName) {
this.firstName = firstName;
}
public String getLastName() {
return lastName;
}
public void setLastName(String lastName) {
this.lastName = lastName;
}
}
In above class, we are holding the student data while sending or receiving it from REST APIs.
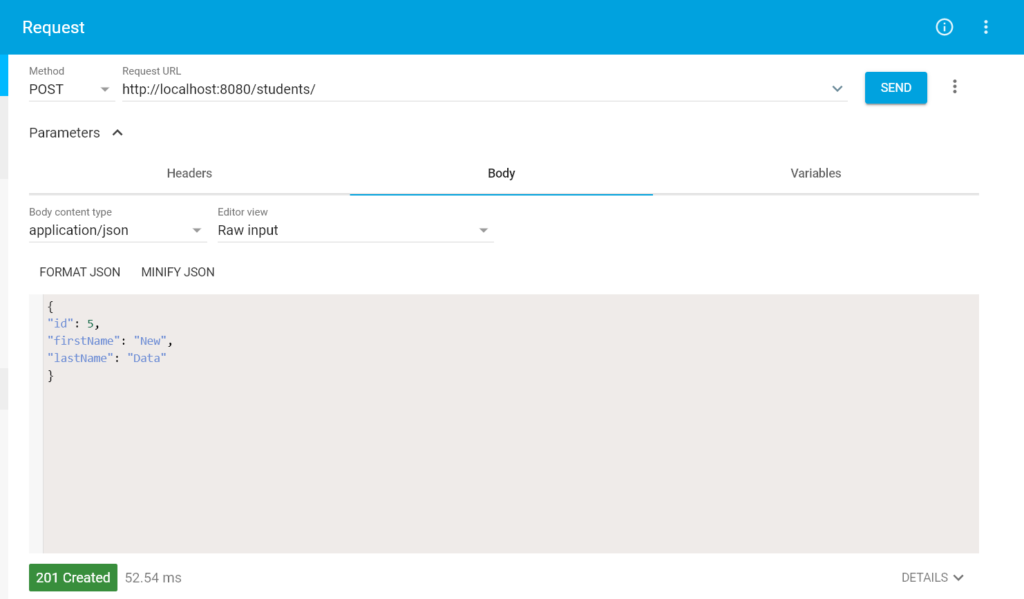
Test the REST API / RESTful Web Service
Let’s test the created REST API using any Rest client. We are using here the Google’s Rest API client :
Http Get request :

Output / Response :

Http Post request :
Conclusion
That’s all folks! In this article, we have learnt What is RESTful web services , How to develop REST API with Spring Boot, The example of Rest API Get and Post Method with Spring Boot.