

In this article of Spring Boot , we will learn complete Spring Boot Cache Example with detailed instructions.
We will learn how to manage Spring Boot application cache using the caching support provided by Spring framework.
Spring Boot has a lot of features to manage the cache and it is very simple to use.
Let’s get started :
What is Cache?
If you are a developer in programming field , it is not possible that you have never heard about Cache. Cache is one of the key component when we are talking about application performance.
Cache is basically a type of memory which increases the speed of accessing data hence it improves the performance for any application.
We know that, basically data for processing resides in main memory of CPU. If everytime data needs to be accessed would be fetched from main memory, It will take time.
So the data , which is frequently being used, is transferred temporarily from the main memory to the Cache memory. It reduces the database hits as data being accessed from the Cache.
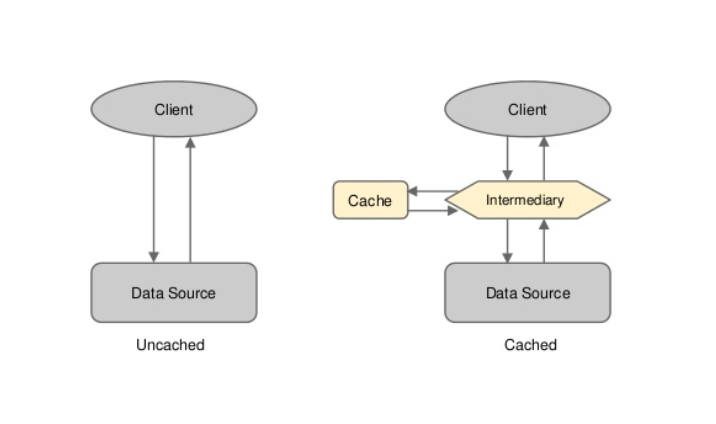
Cache is a temporary memory lies between the application and persistent database.
What is Caching?
Caching is basically a mechanism used for enhancing the performance of application. Caching is a process to store and access data from the Cache.
Why we need Cache?
Application performance is crucially important. Nobody wants their application to take a long time to process requests.
Caching is one of the popular mechanism to improve the application’s performance.
Storing the frequently accessed data into a temporary memory is a great approach to minimise the databases hits every time data access request is been done.
We can use Cache to reduce the costly backend requests.
Accessing data from the memory is a way more fast and cheap rather than fetching data from database or file systems or API calls.
Now we know, What is Cache and Why we need Cache but question arises exactly what data should be stored in a Cache . So let’s understand this :
What data should be Cached / stored in Cache?
This question has different answers for different type of requirements.
It differs with different requirements and scenarios and it depends on how much time we are able to tolerate the stale data.
Thus, Caching candidates / data will vary for each applications.
Below are some of the mentioned examples of which data should be cached for which application :
- List of products should be cached for an eCommerce store
- All the Master data which is changed very few times
- The frequently used DB queries for which results does not changes frequently.
Types of cache
Generally , Cache is of below mentioned four types :
- In-Memory Caching
- Database Caching
- Web Server Caching
- CDN Caching
Let’s understand all of them :
In-Memory Caching
In-Memory Caching is a technique which is widely and most frequently used to increase the performance of applications.
Two Popular In-Memory Caches are Redis and Memcached. These are key-value stores between the application and database / data storage.
As in this type of Cache, data is stored in RAM so it is faster than others where the data is stored on disk.
RAM in comparison with Disk is more limited that’s why algorithms like LRU (Least Recently Used) which helps in cache invalidations can help in invalidating the ‘cold’ entries in RAM and in keeping the ‘hot’ data in RAM.
We mentioned two In-Memory Cache Examples earlier Memcached and Redis.
Memcached is simply a in-memory caching but Redis is more advanced. It allows to maintain the backup and restore facility etc.
Database Caching
Database caching includes Cache in the Databases. By default, Databases includes some level of Caching. Which can be optimized further for use.
We can optimize the default Cache configuration in Database caching to further boosting of the performance of application.
One of the popular Database Cache is Hibernate first level cache.
Web Server Caching
Web servers are also able to cache the requests and also returning the responses and without even contacting the Application servers. These are the technique of Web Server Caching.
Caches and reverse proxies can serve the static and dynamic content directly like in Varnish .
The option to opt for Web server level cache is totally viable especially in today’s API age.
CDN Caching
Caches not only can be stored in Mamory, Databases etc but it can also be located at client side in the browser or server side etc.
In can also be located in a distinct cache layer at client side, These are type of CDN Caching.
Now let’s directly jump to Spring Boot Cache :
Spring boot Cache Annotations
Spring framework itself provides a Cache Abstraction API which works for different cache providers.
The Cache abstraction API of Spring framework is very powerful and yet very easy to use . We can configure this caching by using XML based as well as Annotation based configurations.
We are explaining here the annotation based configuration as this is latest and frequently used.
Similarly it can be done with XML based configurations as well.
@EnableCaching annotation
@EnableCaching annotation used to enable the Spring framework’s annotation-driven cache management.
In Spring Boot, we all have one main class / boot application class which we annotate with the @SpringBootApplication annotation. We need to add our @EnableCaching into this class in our project.
As default cache, Spring framework provides one concurrent hashmap. We can change it to external cache providers by registering them using CacheManager.
@Cacheable annotation
@Cacheable annotation is a method level annotation. It is used in the method whose response is to be cached. It tells Spring that the annotated method’s response is cacheable.
@Cacheable annotation has attributes which defines the cache name. Spring manages the request and response of the method to the specified cache.
E.g. @Cacheable("cache_name_1", " cache_name_2")
This annotation has many other options as well such as we can also specify the key of the cache.
If we specify nothing then Spring uses the all class fields and use those as cache key. It is mostly HashCode. It is done to maintain caching but we can also override this behavior by providing key information.
@Cacheable(value="book", key="#isbn")
public Book findBook(ISBN isbn, boolean checkWarehouse, boolean includeUsed)
@Cacheable(value="book", key="T(classType).hash(#isbn)")
public Book findBook (ISBN isbn, boolean checkWarehouse, boolean includeUsed)
@Cacheable(value="book", key="#isbn.rawNumber")
public Book findBook (ISBN isbn, boolean checkWarehouse, boolean includeUsed)
Conditional Caching can be used as well. See below :
@Cacheable(value="book", condition="#name.length < 30")
public Book findBook (String name)
@CachePut annotation
Sometimes we are required to manipulate or update / put our caching manually before the invoking of method.
By doing this, we will be able to update the cache and will also allow the method for execution. These type of method will be executed and the result will be placed into the Cache as defined by the @CachePut annotation.
@CachePut annotation also supports the similar options as provided by the @Cacheable annotation. It should be basically used for the cache population rather than the optimization of method flow.
Can we use @CachePut and @Cacheable into same method?
Suppose if we will use the @CachePut and @Cacheable annotation together then the method will be discouraged as both the annotation have different behaviors.
The annotation @Cacheable will skip the execution of method by using cache and The annotation @CachePut will force the method execution so that cache would be updated.
This will lead to unexpected behavior of the application so these two annotations should not be used together.
@CacheEvict annotation
@CacheEvict annotation is used to evict or remove the cache which was loaded previously of master data. As soon as the method annotated with this annotation will get executed, the cache will be removed / evicted.
If we need to remove the entire entries of cache we can use allEntries=true or key can be specified to remove the cache.
Removing all entries in one go can be useful rather than clearing each entries by mentioning keys as it would take time and it is inefficient as well.
@Caching annotation
@Caching annotation is simply required to be added if we are using @CachePut and @CacheEvit both at the same time.
How to Register a Cache Engine with Spring Boot?
Spring Boot framework provides support for integration with many cache providers which are mentioned below :
- JCache (JSR-107) (EhCache 3, Hazelcast, Infinispan, and others)
- Hazelcast
- EhCache 2.x
- Redis
- Infinispan
- Simple cache
- Couchbase
If these are present in the class path and we have enabled Cache in the main Spring Boot Application using @EnableCaching then Spring boot itself will do the auto configuration with the default options.
We can change the default behavior by manipulating the cache providers specific settings.
Below is the simple example :
spring.cache.infinispan.config=infinispan.xmlSpring Boot Cache Example
We have learnt all the detailed learning. Time for some practical implementation :
In this Spring Boot Cache Example, we will learn :
- How to enable default caching in spring boot.
- How to enable the caching for one of the business method.
- Test the application performance by calling same method repeatedly.
To test the application, we can simulate the delay in calling of method by using static method Thread.sleep() to see the results.
Create the Spring Boot Project
We are creating our Spring Boot Project here using Spring Initializr API. You can create the project by using other ways as well like using Maven , using CLI and using Spring Starter Project Wizard.
Follow the below steps to create Spring Boot Project using the Spring Initializr API :
- Go to the URL : https://start.spring.io/
- Fill out the Project name and package as per your application.
- Select the main dependency “Spring Web” from the Dependencies option.
- Click on Generate the Project.
- Now the Project must have been downloaded into your System in .zip format. Extract the Project and import it into your Eclipse IDE.
Now our Project is created with following pom.xml :
<?xml version="1.0" encoding="UTF-8"?>
<project xmlns="http://maven.apache.org/POM/4.0.0"
	xmlns:xsi="http://www.w3.org/2001/XMLSchema-instance"
	xsi:schemaLocation="http://maven.apache.org/POM/4.0.0 https://maven.apache.org/xsd/maven-4.0.0.xsd">
	<modelVersion>4.0.0</modelVersion>
	<parent>
		<groupId>org.springframework.boot</groupId>
		<artifactId>spring-boot-starter-parent</artifactId>
		<version>2.2.1.RELEASE</version>
		<relativePath /> <!-- lookup parent from repository -->
	</parent>
	<groupId>com.example</groupId>
	<artifactId>cache-example</artifactId>
	<version>0.0.1-SNAPSHOT</version>
	<name>cache-example</name>
	<description>Demo project for Spring Boot</description>
	<properties>
		<java.version>1.8</java.version>
	</properties>
	<dependencies>
		<dependency>
			<groupId>org.springframework.boot</groupId>
			<artifactId>spring-boot-starter-web</artifactId>
		</dependency>
		<dependency>
			<groupId>org.springframework.boot</groupId>
			<artifactId>spring-boot-starter-test</artifactId>
			<scope>test</scope>
			<exclusions>
				<exclusion>
					<groupId>org.junit.vintage</groupId>
					<artifactId>junit-vintage-engine</artifactId>
				</exclusion>
			</exclusions>
		</dependency>
	</dependencies>
	<build>
		<plugins>
			<plugin>
				<groupId>org.springframework.boot</groupId>
				<artifactId>spring-boot-maven-plugin</artifactId>
			</plugin>
		</plugins>
	</build>
</project>
Creating the HTTP Get Rest API
Now we will create one REST service in our Project. This Rest service will be a search service using GET request.
Main purpose of our application is to cache the response of the method. We will do this in our service layer of the application.
We will also impose some delay in actual backend call to get the result.
In the first hit of the service, the response will get delayed as we will impose some delay in the application but in the further calls we will get much and much faster results.
Below is our Employee.java :
package com.example.cacheexample.domain;
public class Employee {
	String id;
	String name;
	public Employee(String id, String name) {
		super();
		this.id = id;
		this.name = name;
	}
	public String getId() {
		return id;
	}
	public void setId(String id) {
		this.id = id;
	}
	public String getName() {
		return name;
	}
	public void setName(String name) {
		this.name = name;
	}
}
Below is our Service class EmployeeService.java :
package com.example.cacheexample.service;
import org.springframework.cache.annotation.Cacheable;
import org.springframework.stereotype.Service;
import com.example.cacheexample.domain.Employee;
@Service
public class EmployeeService
{
    @Cacheable("employee")
    public Employee getEmployeeByID(String id)
    {
        try
        {
            System.out.println(" Will Sleep for 5 Seconds");
            Thread.sleep(1000*5);
        }
        catch (InterruptedException e)
        {
            e.printStackTrace();
        }
        return new Employee(id,"TechBlogStation");
    }
}
Below is our Controller class EmployeeController.java :
package com.example.cacheexample.controller;
import org.springframework.beans.factory.annotation.Autowired;
import org.springframework.web.bind.annotation.GetMapping;
import org.springframework.web.bind.annotation.PathVariable;
import org.springframework.web.bind.annotation.RestController;
import com.example.cacheexample.domain.Employee;
import com.example.cacheexample.service.EmployeeService;
@RestController
public class EmployeeController
{
    @Autowired
    EmployeeService employeeService;
    @GetMapping("/employee/{id}")
    public Employee findEmployeeById(@PathVariable String id)
    {
        System.out.println("Searching by ID  : " + id);
        return employeeService.getEmployeeByID(id);
    }
}
We can see that in our Service class EmployeeService.java , we have annotated our service layer method getEmployeeByID() with the annotation @Cacheable(“employee”). As we know, this annotation will enable the caching in the annotated method and the name of cache is employee.
We have also simulated 5 seconds delay in the method getEmployeeByID() to understand if response is coming from backend or cache.
Enabling the Spring managed Caching
Now Finally, we will enable the caching by using @EnableCaching annotation.
package com.example.cacheexample;
import org.springframework.boot.SpringApplication;
import org.springframework.boot.autoconfigure.SpringBootApplication;
import org.springframework.cache.annotation.EnableCaching;
@SpringBootApplication
public class MainApp {
	public static void main(String[] args) {
		SpringApplication.run(MainApp.class, args);
	}
}
Testing the Spring Boot Cache Example
Our Spring Boot Cache Example is successful created, Now its time to test the results of Cache. Let’s test the Spring cache behavior.
All the configurations has already been added in the Spring Boot Project.
To test the Spring Boot Cache Example, build the application by running the below command :
$ mvn clean install Or right click on the Project and click on Run As and then Maven Clean and Maven Install :
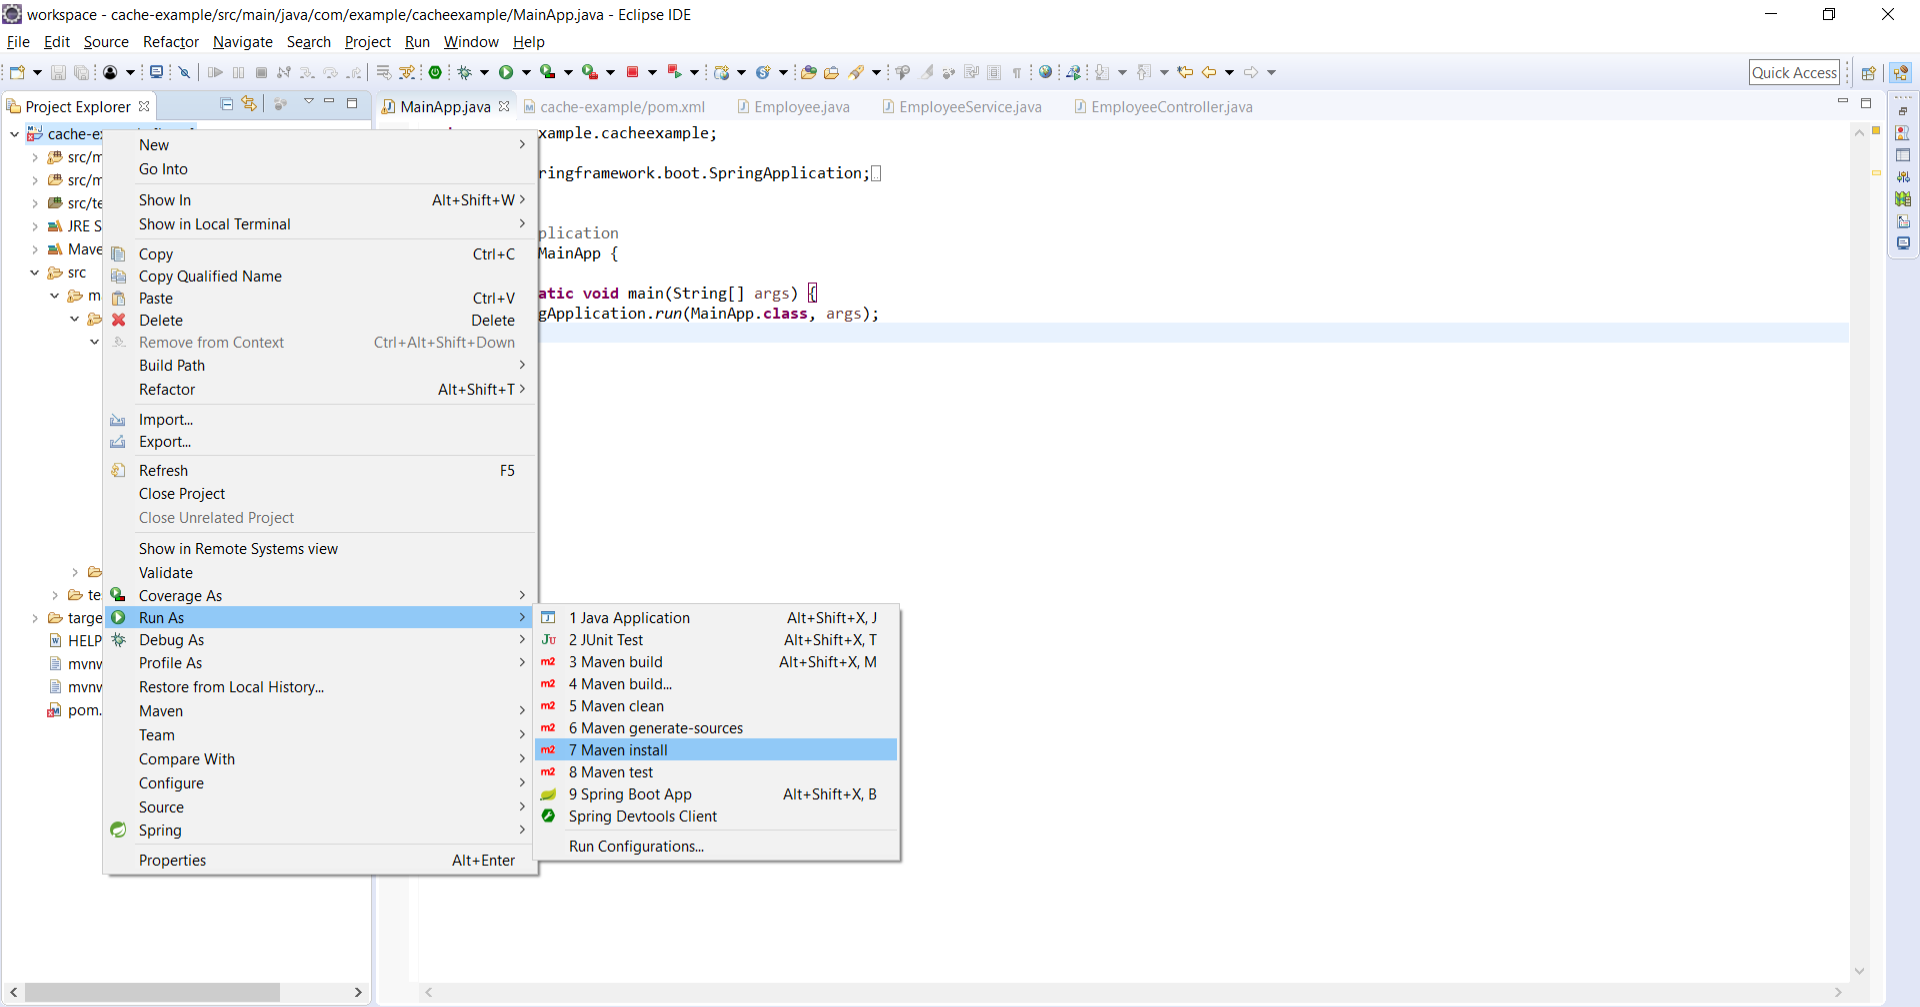
Now Run the Application by right clicking on your project then Run As >> Spring Boot Application :
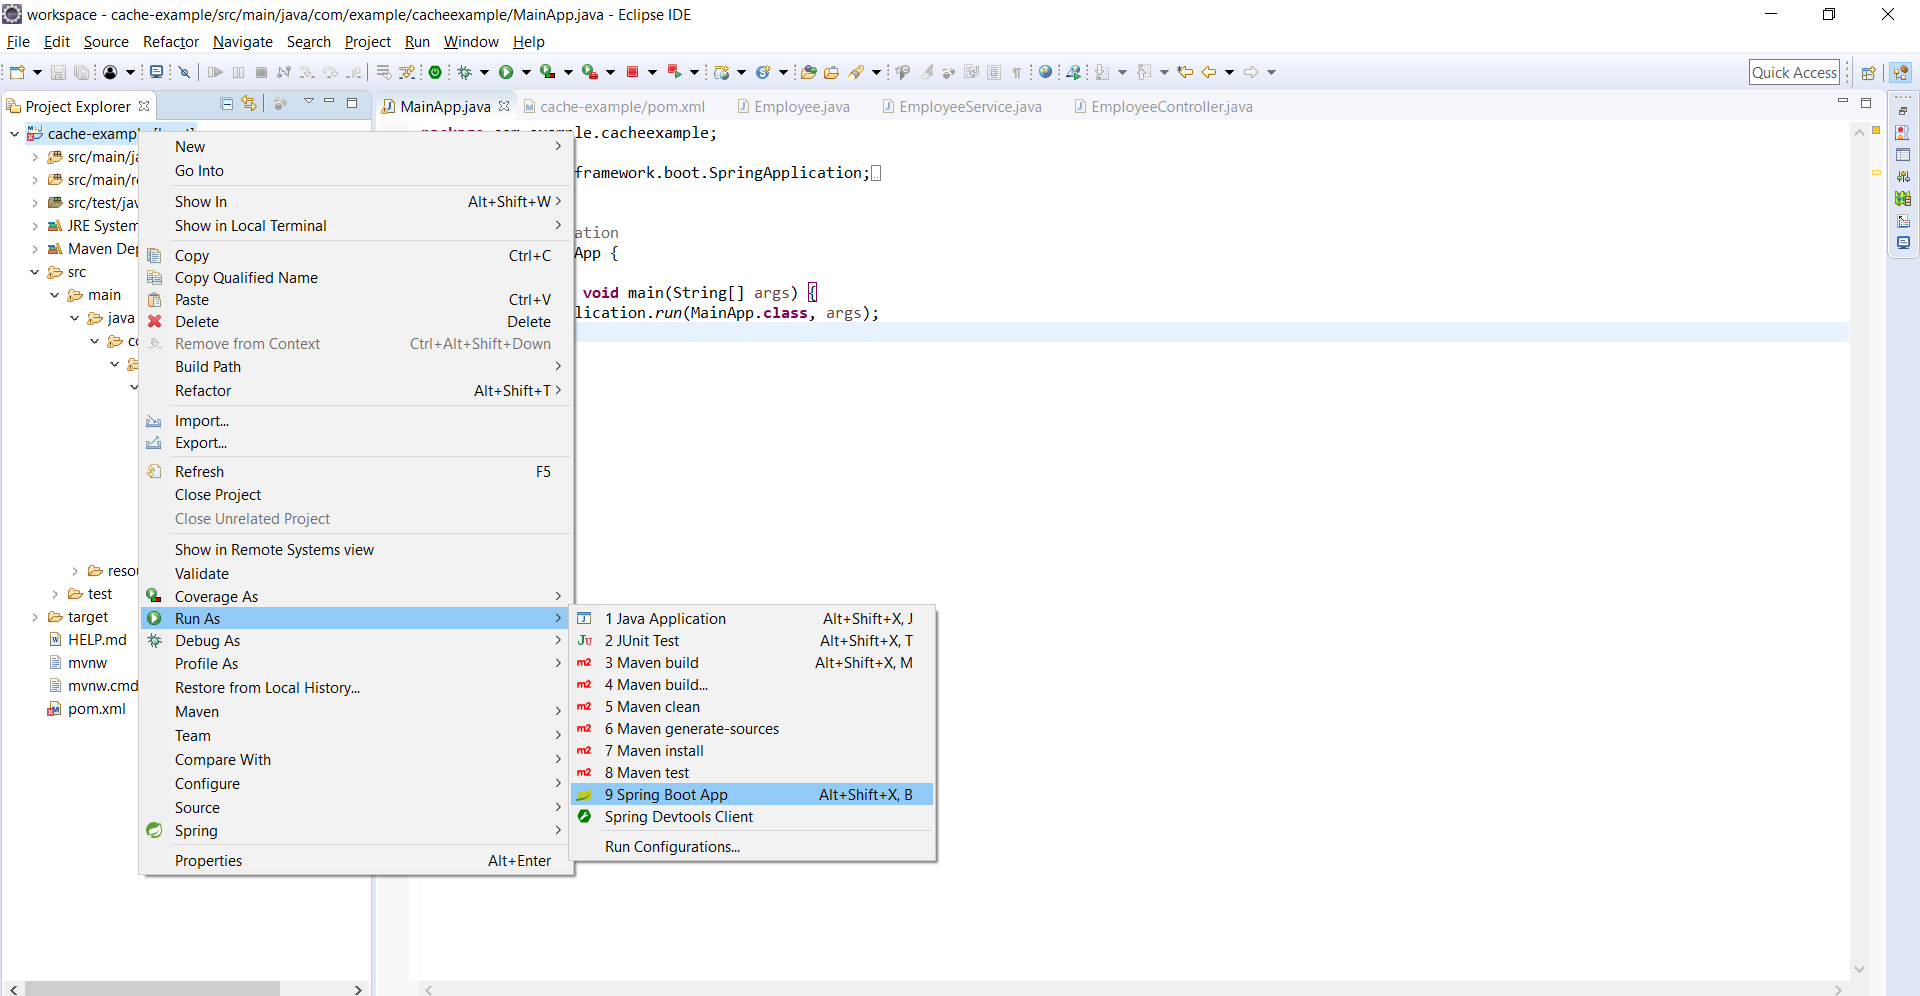
Now hit the url : http://localhost:8080/employee/1
The first response will take at least 5 seconds and then further responses from same url will be much faster. If you are not able to see the difference, change the delay time to 10 seconds and check.
Now hit the url http://localhost:8080/employee/2 to get the response , again there will be time delay.
But if you will again hit the urls then the results will be displayed very fast as this time it will be fetched from the Cache.
Conclusion
In this tutorial, we have learnt all about Cache and Caching , Types of Cache, Annotations used for Spring Boot Cache and we learnt How to use Spring Boot Cache with illustrative examples.