

Spring Boot is very easy to use framework or module and it requires very less configuration to start the application quickly. I try to cover Spring Boot tutorials in as easy language as possible so that beginners can easily learn the framework.
If you have not read my introduction article of Spring Boot, I would request you to take a look – Spring Boot Tutorial.
In my previous tutorial of Spring Boot , I have explained the steps to develop the REST API in Spring Boot with example and explained all the annotations used for REST APIs. Check It Out.
In this article, We will learn to develop a RESTful CRUD ( Create, Retrieve, Update , Delete operations) API with Spring Boot , MySQL, JPA and Hibernate.
So Let’s get started -
Overview
In this article, we will develop one simple application or REST API and we will cover the CRUD operations using the MySql database , Hibernate and JPA.

In the below tutorial, we will develop Spring Boot Application to get the Students record from the database , Create / Update the Student in the Database, Delete the Student from the Database using REST API.
- Spring Boot: With Spring Boot, it is now a very easy process to create stand alone, ready for production spring applications with almost zero configuration.
- JPA: JPA simplifies the data access layer. It requires no boilerplate code of DAO classes.
- Hibernate: Hibernate is an ORM framework. It is the implementation of JPA. It requires no boilerplate jdbc code.
- MySQL - Database.
- REST API- REST is basically used for developing Web services which are maintainable, lightweight and scalable.
- CRUD - CRUD is basically database operations - Create , Retrieve, Update and Delete.
Environment Details
- Eclipse
- Maven
- JDK 1.8
- Spring Boot 2.1.3
- Hibernate
- JPA
- Mysql Database
Create the Spring Boot Project
We are using Eclipse IDE here for the tutorial.
There exists following ways to create Spring Boot project. We can use any of below mentioned approach to create Spring Boot Application :
Here we are explaining this tutorial by following “Spring Boot Project with Maven”. You can check and test any of the above mentioned way.
Go to File >> New >> Project in Eclipse:

Select Maven Project from the project wizard and press Next :
Select the option “create a simple project (skip archetype selection)” and click Next :
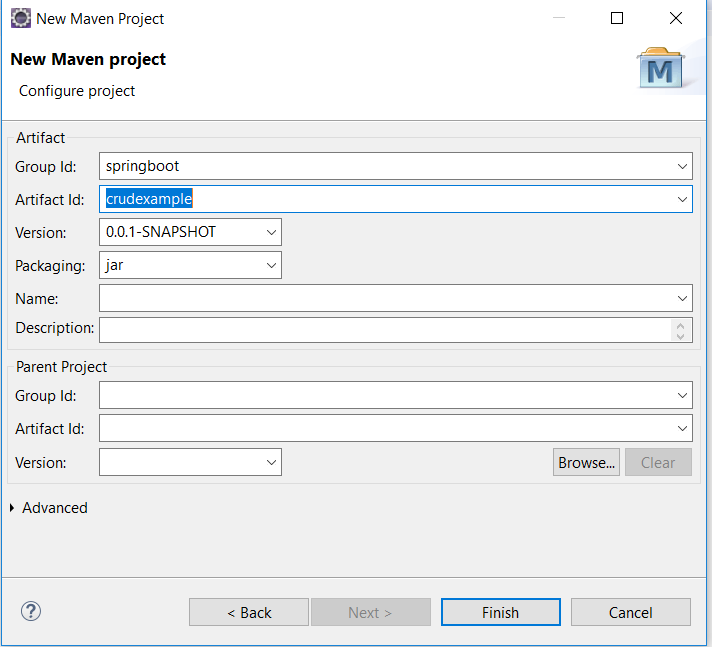
Provide Project name and click on Finish :
Now, Add the below dependencies in pom.xml to configure Spring Boot :
<parent>
	<groupId>org.springframework.boot</groupId>
	<artifactId>spring-boot-starter-parent</artifactId>
	<version>2.1.3.RELEASE</version>
</parent>
<dependencies>
	<dependency>
		<groupId>org.springframework.boot</groupId>
		<artifactId>spring-boot-starter-web</artifactId>
	</dependency>
</dependencies>
<properties>
	<java.version>1.8</java.version>
</properties>
The benefit of adding above parent spring-boot-starter-parent is that managing of version becomes easy.
spring-boot-starter-web is the most useful and necessary dependency for Spring Boot as this is used for developing web app , REST APIs , Spring MVC application and it uses the Tomcat as its default container.
Now, Create the Launch class for Spring Boot Application :
package com.techblogstation;
import org.springframework.boot.SpringApplication;
import org.springframework.boot.autoconfigure.SpringBootApplication;
@SpringBootApplication
public class MainApp {
	public static void main(String[] args) {
		SpringApplication.run(MainApp.class, args);
	}
}
@SpringBootApplication indicates this class is a configuration class.
SpringApplication is used here as it bootstraps and auto-configures our application and also it starts the embedded Tomcat server. As we have passed the class name in run method argument, It indicates that this is primary Spring Component for our Project.
Configure the MySQL Database / Data Source
To Configure the MySQL database in your Spring Boot Application- Add the MySQL dependency in your project’s pom.xml file :
<dependency>
    <groupId>mysql</groupId>
    <artifactId>mysql-connector-java</artifactId>
    <version>8.0.16</version>
</dependency>
As we know, Spring Boot requires very less configuration and Spring Boot itself takes care of almost every configuration. Spring Boot automatically reads the database configuration from the application.properties file.
So, we are only required to add our configuration and rest will be taken care by the Spring Boot framework.
application.properties file exists in the src/main/resources folder.
Add following to the file :
# Data Source Configuration, URL , UserName and Password for the Database
spring.datasource.url=jdbc:mysql://localhost:3306/crud_app
spring.datasource.username=root
spring.datasource.password=root
- Create the DataBase in MySql and change the above data source properties as per your database name, username and password.
- In Above example, My database name is crud_app and username / password is root / root.
Configure Hibernate / JPA in Spring Boot Application
Spring Boot comes with one dependency - spring-boot-starter-data-jpa . It is used to connect the Spring Boot application with relational databases efficiently.
Spring Boot by default uses the Hibernate for JPA implementation. So if we add the below dependency in our project, Hibernate by default will get used.
To Configure the Hibernate in your Spring Boot Application- Add the below JPA dependency in your project’s pom.xml file :
        <dependency>
            <groupId>org.springframework.boot</groupId>
            <artifactId>spring-boot-starter-data-jpa</artifactId>
        </dependency>
Add the following properties to the application.properties file :
# Hibernate Properties # The SQL dialect is used to generate the better SQL
spring.jpa.properties.hibernate.dialect = org.hibernate.dialect.MySQL5InnoDBDialect
# Hibernate ddl auto property
spring.jpa.hibernate.ddl-auto = update
- Spring Boot by default uses the Hibernate for JPA implementation.
- We have initialized the database using spring.jpa.hibernate.ddl-auto property.
- We can use any value (create, create-drop, validate, update, none) for this property.
- In below example, we have used ‘update’ value for this property. It will automatically creates the table in the database if not exists.
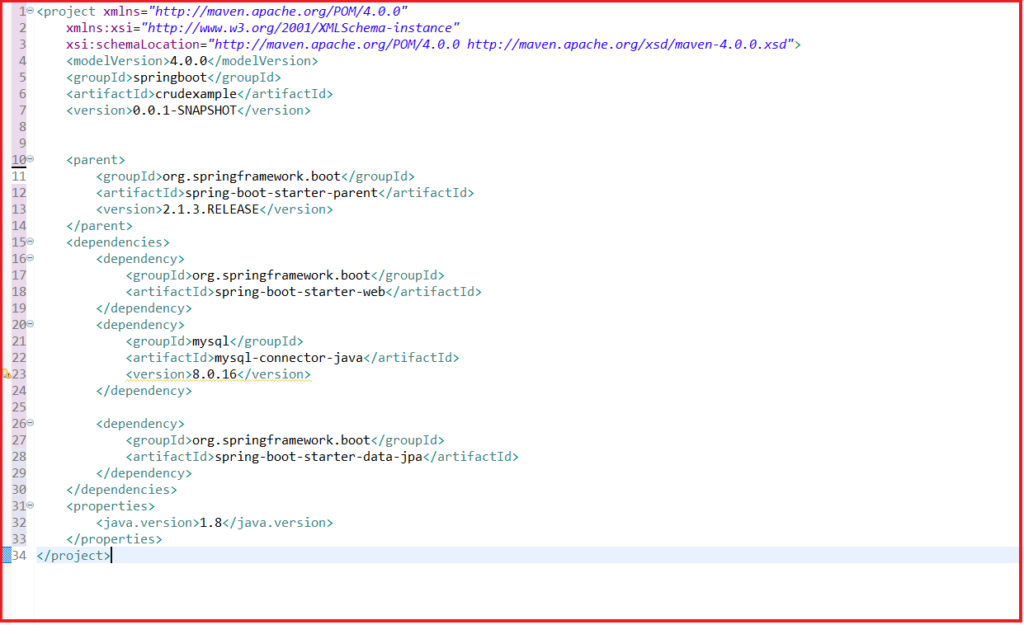
After all the above configurations below is our pom.xml and application.properties file :
pom.xml :
application.properties :

Create the Model class / JPA Entity class
Now let’s create our Model class or JPA Entity in the application. The model class will use to hold the data , these classes are used to structure the data in the form of JPA Entity class.
Below is the StudentEntity.java file under com/techblogstation/model , which has following fields :
- id - Corresponding column in mysql is ‘id’ . This is primary key with auto increment value.
- firstName - Corresponding column in mysql is ‘first_name’ . It is a non null field.
- lastName - Corresponding column in mysql is ‘last_name’ .
- branch - Corresponding column in mysql is ‘branch’ .
- emailId - Corresponding column in mysql is ’email_id’ . It is a non null field.
package com.techblogstation.model;
import javax.persistence.Column;
import javax.persistence.Entity;
import javax.persistence.GeneratedValue;
import javax.persistence.Id;
import javax.persistence.Table;
@Entity
@Table(name = "STUDENT_DETAILS")
public class StudentEntity {
	@Id
	@GeneratedValue(strategy = GenerationType.IDENTITY)
	private Long id;
	@NotBlank
        @Column(name = "first_name")
	private String firstName;
	@Column(name = "branch")
	private String branch;
	@Column(name = "last_name")
	private String lastName;
	@NotBlank
        @Column(name = "email_id", nullable = false, length = 100)
	private String emailId;
	@Override
	public String toString() {
		return "StudentEntity [id=" + id + ", firstName=" + firstName + ", branch=\" + branch +\", lastName=" + lastName
				+ ", emailId=" + emailId + "]";
	}
	// Setter and Getter methods for above fields
           ........
}
The model classes or JPA Entity classes are annotated with the @Entity annotation. This annotation denotes the class as a persistent Java class.
@Table annotation is a class level annotation and it defines the table name with which this entity class is mapped.
@Id annotation is a field level annotation and it defines that the field is primary key.
@GeneratedValue annotation defines the strategy for the generation of primary key. In our example, we have defined that the primary key is to be Auto Incremented.
@NotBlank annotation simply check for the validation that the respective field is not null.
@Column annotation defines some properties for the column mapped with the annotated field. We can define properties like the name of column, the acceptable length , nullable is true or false etc.
If we do not provide the name of the column using @column annotation then it maps the field with the column having same name. It also replaces the camel case letter with the underscore to check the corresponding column.
For Example : for the field firstName , it will by default map the column name first_name .
Create the Repository to access the data from the database
After the Model class, we need the repository to access the data from the database.
The Spring JPA comes up with a JpaRepository interface . This interface defines all the methods used for CRUD operations on the entity.
Spring JPA also has one default implementation of the JpaRepository interface which is SimpleJpaRepository.
Now, let us create our repository inside the com/techblogstation/repository folder or package.
StudentRepository.java :
package com.techblogstation.repository;
import org.springframework.data.jpa.repository.JpaRepository;
import org.springframework.stereotype.Repository;
import com.techblogstation.model.StudentEntity;
@Repository
public interface StudentRepository
        extends JpaRepository<StudentEntity, Long> {
}
We have annotated the above interface with @Repository annotation. @Repository annotation specifies that this needs to be considered during component scan for the application.
Our Repository layer is now ready.
JpaRepository has several methods like save, delete, count , findOne etc. These methods are implemented by the SimpleJpaRepository class so we do not need to implement these methods.
Create Custom Exception for your application
We have already defined the Model and Repository. We will later create the Service to perform the CRUD operations (Create, Retrieve, Update , Delete ). The service class will throw the RecordNotFoundException in case the record does not exist in the Database.
Below is the RecordNotFoundException.java class inside the package com.techblogstation.exception :
package com.techblogstation.exception;
import org.springframework.http.HttpStatus;
import org.springframework.web.bind.annotation.ResponseStatus;
@ResponseStatus(value = HttpStatus.NOT_FOUND)
public class RecordNotFoundException extends RuntimeException {
    private String exceptionDetail;
    private Object fieldValue;
    public RecordNotFoundException( String exceptionDetail, Long fieldValue) {
        super(exceptionDetail+" - "+fieldValue);
        this.exceptionDetail = exceptionDetail;
        this.fieldValue = fieldValue;
    }
    public String getExceptionDetail() {
        return exceptionDetail;
    }
    public Object getFieldValue() {
        return fieldValue;
    }
}
Above class has simple Java code to create the custom exception in Java.
We have annotated our above exception class with @ResponseStatus. This annotation tells Spring Boot to respond with the specified HTTP status code in case the exception is thrown.
In Our example, we have thrown HttpStatus.NOT_FOUND.
Create the Service to use the Repository for performing CRUD operations
The Service layer is optional but still I recommend it to use to perform the additional logic. This way your code becomes clean and easy to understand. The Service layer is also known as Business layer.
We are using Service here for connecting with the repository to perform CRUD operations.
Below is our Service StudentService.java inside the com.techblogstation.service package :
package com.techblogstation.service;
import java.util.ArrayList;
import java.util.List;
import java.util.Optional;
import org.springframework.beans.factory.annotation.Autowired;
import org.springframework.stereotype.Service;
import com.techblogstation.exception.RecordNotFoundException;
import com.techblogstation.model.StudentEntity;
import com.techblogstation.repository.StudentRepository;
@Service
public class StudentService {
    @Autowired
    StudentRepository repository;
    public List<StudentEntity> getAllStudents()
    {
        List<StudentEntity> studentList = repository.findAll();
        if(studentList.size() > 0) {
            return studentList;
        } else {
            return new ArrayList<StudentEntity>();
        }
    }
    public StudentEntity getStudentById(Long id) throws RecordNotFoundException
    {
        Optional<StudentEntity> student = repository.findById(id);
        if(student.isPresent()) {
            return student.get();
        } else {
            throw new RecordNotFoundException("No student record exist for given id",id);
        }
    }
    public StudentEntity createOrUpdateStudent(StudentEntity entity) throws RecordNotFoundException
    {
    	if(entity.getId()!=null)
    	{
    	  Optional<StudentEntity> student = repository.findById(entity.getId());
    	if(student.isPresent())
        {
        	StudentEntity newEntity = student.get();
            newEntity.setEmailId(entity.getEmailId());
            newEntity.setFirstName(entity.getFirstName());
            newEntity.setLastName(entity.getLastName());
            newEntity.setBranch(entity.getBranch());
            newEntity = repository.save(newEntity);
            return newEntity;
        } else {
            entity = repository.save(entity);
            return entity;
        }
    	}
    	else
    	{
    		entity = repository.save(entity);
    		return entity;
    	}
 }
    public void deleteStudentById(Long id) throws RecordNotFoundException
    {
        Optional<StudentEntity> student = repository.findById(id);
        if(student.isPresent())
        {
            repository.deleteById(id);
        } else {
            throw new RecordNotFoundException("No student record exist for given id",id);
        }
    }
}
@Service annotation used to declare the class as a Service class which holds the business logic.
In our above Service class , we are injecting the instance of class StudentRepository using @Autowired annotation.
Spring Data JPA will automatically generate the proxy instance of the class StudentRepository and will inject it to the instance of StudentService class.
The above methods is StudentService class are calling the JpaRepository’s methods to retrieve the Students/ delete the Student / Create or Update the Student from the database.
Create the Controller for REST API
Finally we are here to create the Controller. This will be used to expose all the operations through the REST API endpoints / urls. Client Application needs to be connect with these endpoints to perform the create / update / retrieve / delete operations on Students Records in Database.
Below is our controller class StudentController.java inside the package com.techblogstation.controller :
package com.techblogstation.controller;
import java.util.List;
import org.springframework.beans.factory.annotation.Autowired;
import org.springframework.http.HttpHeaders;
import org.springframework.http.HttpStatus;
import org.springframework.http.ResponseEntity;
import org.springframework.web.bind.annotation.DeleteMapping;
import org.springframework.web.bind.annotation.GetMapping;
import org.springframework.web.bind.annotation.PathVariable;
import org.springframework.web.bind.annotation.PostMapping;
import org.springframework.web.bind.annotation.RequestMapping;
import org.springframework.web.bind.annotation.RestController;
import com.techblogstation.model.StudentEntity;
import com.techblogstation.exception.RecordNotFoundException;
import com.techblogstation.service.StudentService;
@RestController
@RequestMapping("/students")
public class StudentController
{
    @Autowired
    StudentService service;
    @GetMapping
    public ResponseEntity<List<StudentEntity>> getAllStudents() {
        List<StudentEntity> list = service.getAllStudents();
        return new ResponseEntity<List<StudentEntity>>(list, new HttpHeaders(), HttpStatus.OK);
    }
    @GetMapping("/{id}")
    public ResponseEntity<StudentEntity> getStudentById(@PathVariable("id") Long id)
                                                    throws RecordNotFoundException {
    	StudentEntity entity = service.getStudentById(id);
        return new ResponseEntity<StudentEntity>(entity, new HttpHeaders(), HttpStatus.OK);
    }
   @PostMapping
    public ResponseEntity<StudentEntity> createOrUpdateStudent(@Valid @RequestBody StudentEntity student)
                                                    throws RecordNotFoundException {
    	StudentEntity updated = service.createOrUpdateStudent(student);
        return new ResponseEntity<StudentEntity>(updated, new HttpHeaders(), HttpStatus.OK);
    }
    @DeleteMapping("/{id}")
    public HttpStatus deleteStudentById(@PathVariable("id") Long id)
                                                    throws RecordNotFoundException {
        service.deleteStudentById(id);
        return HttpStatus.FORBIDDEN;
    }
}
Let’s understand the above class definition and all its annotations :
We have annotated our controller class with @RestController. This annotation tells Spring that the annotated class is serving the REST API requests.
@RestController annotation in Spring Boot is combination of @Controller and @ResponseBody annotation.

@Controller annotation simply defines the class as a controller.
@ResponseBody annotation defines that it will return the response body of a request.
@RequestMapping annotation is used to specify the resource uris. This annotation can be applied on class and method level.
@RequestMapping(“/students”) in above example declares that the url for all the apis exposed in this class will start with /students.
We have injected the instance of StudentService class by using @Autowired annotation.
Now let us understand all the apis / methods available in the above class one by one :
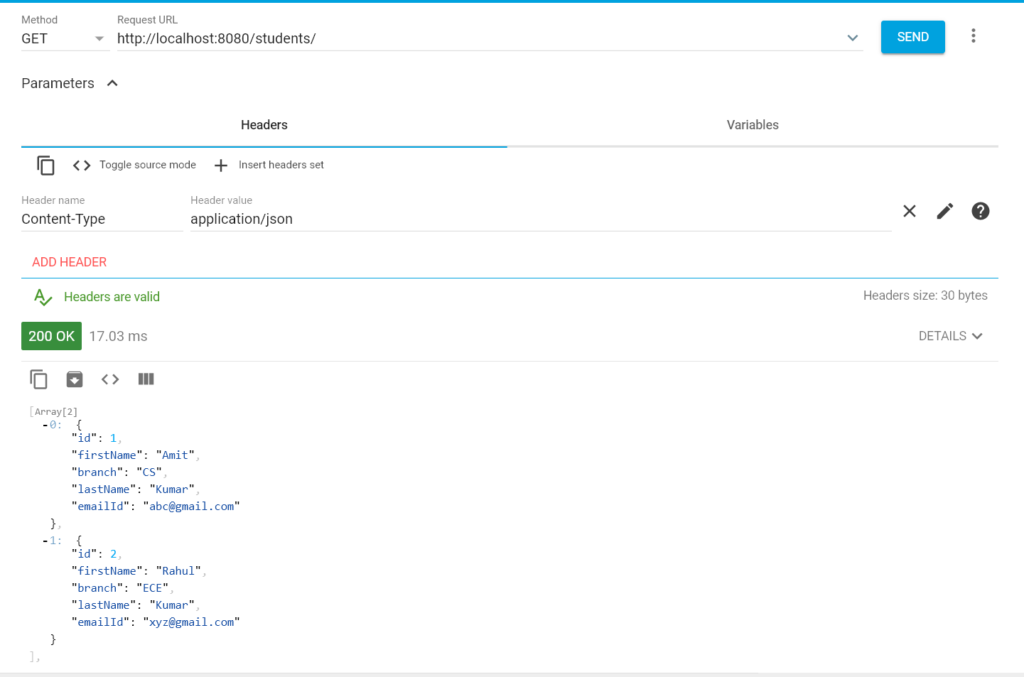
@GetMapping to retrieve all the Students
@GetMapping
public ResponseEntity<List<StudentEntity>> getAllStudents() {
    List<StudentEntity> list = service.getAllStudents();
    return new ResponseEntity<List<StudentEntity>>(list, new HttpHeaders(), HttpStatus.OK);
}
In the above method , we are calling the getAllStudents() method of the StudentService class, which is returning the List containing the Student Data.
@GetMapping defines that the annotated method will get called with Http Get method .
The above method will get called with the path /students (which we have defined at class level).
@GetMapping(“/{id}”) to retrieve the Student with the specific id
    @GetMapping("/{id}")
    public ResponseEntity<StudentEntity> getStudentById(@PathVariable("id") Long id)
                                                    throws RecordNotFoundException {
    	StudentEntity entity = service.getStudentById(id);
        return new ResponseEntity<StudentEntity>(entity, new HttpHeaders(), HttpStatus.OK);
    }
In the above method , we are calling the getStudentById() method of the StudentService class, which is returning the Student against the provided id.
The above method will get called with the path /students/{id} .
The annotation @PathVariable is used to bind the path variable and the method parameter.
@PostMapping to create or update the Student
    @PostMapping
    public ResponseEntity<StudentEntity> createOrUpdateStudent(StudentEntity student)
                                                    throws RecordNotFoundException {
    	StudentEntity updated = service.createOrUpdateStudent(student);
        return new ResponseEntity<StudentEntity>(updated, new HttpHeaders(), HttpStatus.OK);
    }
@PostMapping defines that the annotated method will get called with Http Post method .
In the above method , we are calling the createOrUpdateStudent() method of the StudentService class.
The above method will get called with the HTTP post request with the path /students (which we have defined at class level).
@DeleteMapping(“/{id}”) to delete the Student of specified id
    @DeleteMapping("/{id}")
    public HttpStatus deleteStudentById(@PathVariable("id") Long id)
                                                    throws RecordNotFoundException {
        service.deleteStudentById(id);
        return HttpStatus.FORBIDDEN;
    }
In the above method , we are calling the deleteStudentById() method of the StudentService class.
Run and Test the Application
Now, It’s time to test our application :
Run the application as Spring Boot App in Eclipse IDE. We are using Google Rest API Client here for testing our Application , You can use any other REST API client as well:
@GetMapping API
@GetMapping(“/{id}”) API

@PostMapping API

@DeleteMapping(“/{id}”) API

Conclusion
We have learned about making Spring Boot application with hibernate , Rest API and various CRUD operations in mysql. We have also learnt configuring the mysql datasource and RESTful service.